
A recent report indicates that 76% of companies that use marketing automation experience a positive return on investment within a year.
Marketing Automation is no longer a choice but a necessity for businesses looking to stay competitive. By automating repetitive processes, teams can focus on strategic goals, reduce errors, and improve response times.
In this blog, we'll explore the best practices for HubSpot workflow automation. Discover how your business can optimize its processes using these best practices.
Key Takeaways
- To use HubSpot workflows effectively, set clear goals, use consistent naming conventions, and avoid overlap between workflows.
- Automate routine tasks using HubSpot marketing automation workflows. This will reduce manual work and allow your team to focus on more valuable activities.
- Continuously review and improve your workflows to make sure they match current business goals.
- Change triggers, actions, and segmentation criteria as needed to keep your processes running well and effectively.
HubSpot Workflow Best Practices
HubSpot’s marketing automation can help you automate mundane tasks, nurture leads, and deliver personalized content. This can be achieved using key practices like segmenting your audience for targeted messaging, optimizing workflows for efficiency, and regularly analyzing performance metrics.
Let’s begin by understanding how you can make use of HubSpot workflows in the best possible way to target your customers.
1. Clearly Define Your Goals
Before you start creating workflows and using HubSpot Automation, it's important to set goals. Setting realistic and SMART goals is crucial.
What is the SMART Framework?
- S- Specific - Clearly define the goals by stating what exactly you want to achieve.
- M- Measurable- Ensure that the goal can be assessed using concrete criteria.
- A- Achievable- Set a realistic goal that is achievable with the provided constraints and resources.
- R- Relevant- The objective aligns well with the broader business goals or priorities.
- T- Time-based- Define a timeframe for attaining the goal.
Pro Tip: Always start with small, clear goals before moving on to complex ones.
This ensures that your goals are real, actionable, and achievable. When setting up your HubSpot Automation Workflow goals, you must define measurable criteria that can clarify the project's success.
Make sure to include measuring email engagement, increasing lead conversion, form submissions, CTA interaction, and even newsletter submission.
2. Use Proper Segmentation for Targeted Automation
Properly segmenting your contacts or leads before setting up workflows is essential for effective HubSpot automation workflow. This helps make sure that your automation efforts are targeted, relevant, and successful.
Before you start creating workflows, group your contacts or leads into specific categories. This helps you send personalized messages to make sure the right people get the right content at the right time. You can even improve how you communicate, nurture leads, and ultimately close more deals.
If you don't group your contacts, your automated messages may not be relevant, which can reduce how many people engage and how many sales you make.
Here are factors that you should consider while segmenting your lists for better targeting.

-
Segment by Lifecycle Stage
Group your leads based on where they are in the customer journey, such as new leads, MQLs, SQLs, or existing customers. This will help you send them content that meets their current needs.
-
Segment by Industry or Company Size
Categorizing contacts based on the industry or company size can help B2B businesses communicate more effectively. Tailor your content to address the specific challenges or needs of their industry.
-
Segment by Behavior
Create lists based on how users interact with your website, emails, or specific campaigns using behavioral data. This can include page visits, content downloads, or email clicks.
-
Use Demographic Information
To target your audience more effectively, consider using data such as geographic location or age group.
-
Personalization Using Dynamic Fields for Better Engagement
Once you've grouped your contacts, use HubSpot's dynamic fields to personalize your messages. Dynamic fields, such as adding the contact's first name, company name, or industry, make your communications feel customized and personal. This increases engagement, helping you build stronger connections with your audience and improve conversion rates.

3. Simplify Your Workflows
Simplifying workflows is essential for maximizing the effectiveness of HubSpot marketing automation. Streamlined processes improve efficiency, reduce errors, and enhance overall performance. Here are some key strategies to simplify your workflows:
- Identify Core Processes: Start by mapping your current workflows to find essential processes. Focus on the steps that directly contribute to your goals and remove any unnecessary tasks or complexities.
- Use Clear Triggers: Set simple triggers for your workflows. Clear triggers make sure that actions start under the right conditions, reducing confusion and improving responsiveness.
- Limit Workflow Steps: Simplify workflows by reducing the number of steps. This makes it easier for team members to understand and follow the process, leading to faster implementation and fewer errors.
- Use Standardized Templates: Save time and ensure best practices by using HubSpot's ready-made templates for common workflows. These templates provide a strong starting point and help you follow best practices.
- Start Small: Begin by simplifying workflows with a few essential processes. This makes it easier to manage and adjust before expanding.
- Stick to Simple Processes: Make sure your processes are clear and easy to follow. This simplicity helps team members work through tasks more efficiently and reduces the chances of confusion.
4. Workflow Organization
A well-organized and clean HubSpot portal is essential for the workflow's success. On the contrary, a disorganized workflow can create a lot of confusion, errors, and inefficiency that can affect business operations.
A well-organized portal is a happy portal.
However, to keep it clean and well organized, several things need to be kept in place. Let's check.
- Use Naming Conventions
Create consistent and clear naming conventions for your workflows. A good naming convention strategy can make it easy for everyone to identify and search for the workflows.
For instance, you can categorize your workflows using prefixes like "Internal notification,” “OnChange,” or any relevant, as shown below.
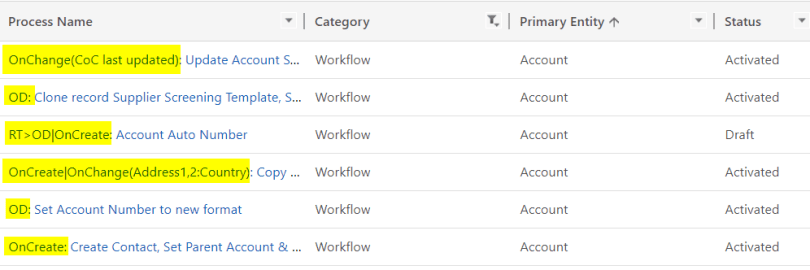
These naming conventions help businesses simplify searching, easily filtering searches, providing clarity, and even maintaining consistency across the teams.
- Folder Structuring
You can also use the logical folder structure within the HubSpot platform, which facilitates organizing your workflows.
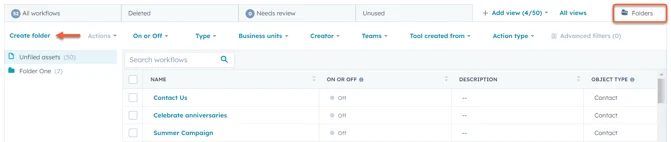
Once created, folders will display your workflows on the dashboard, as shown in the image above. This allows you to group similar workflows together in a single folder and can make the navigation easygoing.
Other than these, the three practices mentioned below can also help you organize your HubSpot workflows efficiently.
- Archive and delete any unused or outdated workflows.
- Regularly check and audit your workflows.
- Keep the contact and company records updated.
5. Leverage Enrollment and Suppression Criteria
Setting workflow enrollment triggers can help you automatically enroll records in a workflow when they meet certain criteria or complete an event. Based on the workflow type, the different types of enrollment triggers are available.

With HubSpot's new AI-powered enrollment triggers, you can now generate workflows automatically based on key actions or conditions, allowing AI to intelligently design the entire workflow for you from start to finish.
.png?width=1640&height=924&name=Event%20Enrollment%20Triggers%20(1).png)
6. Test Your Workflows Before Going Live
Test your workflow to make sure your automation is working as expected. There are two testing features in workflows. Use the test criteria feature:
- To check which enrollment criteria a specific contact, company, deal, quote, or ticket record meets.
- To simulate how a specific record will go through a workflow once enrolled.
7. Monitor Workflow Performance
Actively reviewing your workflows through conversions and data performance is a key step in understanding the effectiveness of your workflow. This proactive approach can significantly contribute to optimizing strategies and enhancing business outcomes.
However, to do so, you first need to turn on the metrics, and then you can review your workflow performance by analyzing those metrics. Below is how you can do that.
To turn on the metrics, follow the below step-by-step process,
- Go to automations in your HubSpot account.
- Select "Workflows"
- Select the name of your workflow
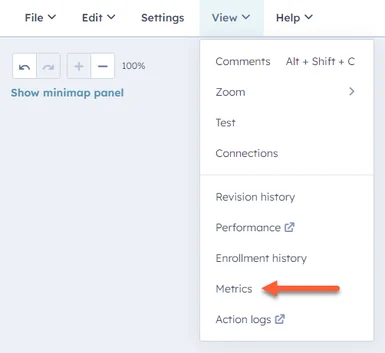
- Click on "View" available at the top of the screen
- From the dropdown options, select "Metrics," as shown below
In the right panel, click on the "Turn on metrics" button as shown,
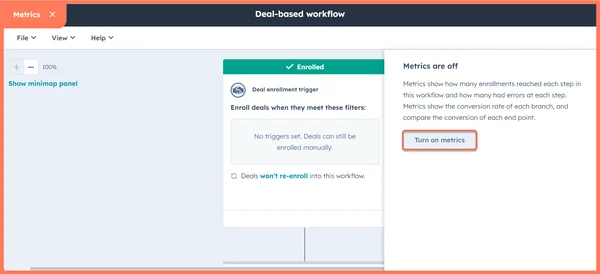
Once you've enabled the metrics, it's time to dive in and explore. You can now review the metrics to analyze the workflow's conversion and performance data.
In the metrics view, you can review the following.
- The enrollment percentage that reached each endpoint
- The total enrollment count for the workflow.
- For each action, the unenrollment counts that occurred due to a specific action.
- For any branch action, the enrollment percentage that continued alog each branch path.

However, to get more details about the performance, you can hover over the performance data.
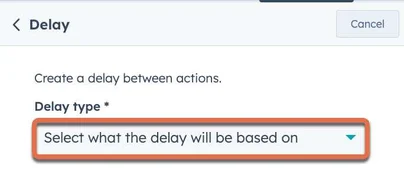
8. Use Delays and Timings to Your Advantage
When you create workflows, using time delays to space out the timing of your email sending can make the experience more personalized for your customers and prospects.
You can add delays to your workflows to pause the workflow actions. Below are six different types of delays that you can include in your HubSpot marketing automation workflows.
- Calendar date: This delay holds back enrolled records until a specific date. Use this delay when you want an action to happen only on a particular date.
- Date property: To delay enrolled records until a specific date, use this delay with a date property. This delay ensures that an action will only be executed on the specified date based on a particular property of date.
- Event occurrence: This delay holds back enrolled records until they finish an action, like submitting a form or visiting a website page. Use this delay when you need to pause enrolled records until a specific action is completed. You can also set this delay based on internal events, such as finishing a task.
- Set amount of time: This feature allows you to delay enrolled records for a specific amount of days, hours, and minutes. You can use this delay when you want to pause all enrolled records for the same amount of time between workflow actions.
- Days of the week: This delay holds back enrolled records until a specific day. Use this delay when you want an action to happen only on a certain day.
- Time of day: This function allows you to postpone the execution of actions until a specific time. Use this delay when you want an action to occur only at certain times.
9. Automate Task Assignments and Internal Notifications
Automating task assignments and internal notifications allows teams to stay organized, act quickly, and improve response times. It streamlines sales and service processes, ensuring that the team is always in sync and prioritizes the most important tasks at the right time.
- Set up workflows for task automation
You can set up workflows to automatically assign tasks to team members based on specific triggers. For example, when a lead reaches a certain stage, you can automatically assign a follow-up task to the appropriate sales representative. This helps ensure that no opportunities are missed and that follow-ups are done promptly. - Trigger internal notifications
Set up workflows to notify team members instantly by email or in-app messages when important actions, like a new high-quality lead entering the system, occur. This ensures that the relevant team members can respond quickly and effectively. - Customize notifications
Customize the notifications based on the type of action. For example, set different alerts for high-value leads, sales opportunities, or customer escalations. This ensures the right team member gets notified at the right time for a fast response.
10. Avoid Workflow Overlap and Redundancy
To ensure efficient workflows and avoid confusion, it is essential to eliminate overlap and redundancy in your processes. Simplifying your workflows will help you automate smoothly and prevent conflicting actions.
To avoid workflow overlap:
- Ensure that contacts are not enrolled in multiple workflows with conflicting actions.
- Use exclusion lists or enrollment triggers to avoid duplication or conflicting actions. This can stop contacts from entering more than one workflow and prevent issues such as sending the same email twice or assigning leads to different sales teams.
- Regularly review your workflows to identify any potential conflicts.
Consolidate similar workflows
Consolidate similar workflows instead of creating multiple ones. This reduces redundancy and simplifies your overall automation setup.
For example, separate lead nurturing and customer follow-up workflows can be merged into a single process with dynamic actions tailored to the lead’s stage in the lifecycle.
Pro HubSpot Workflow Tips
By now, you must have obtained the essential tips for HubSpot automation workflows. However, there’s a lot more to it. By integrating the following pro tips from experts into your HubSpot Automation, you can expand your workflow capabilities and remain competitive.
1. Conditional Logic and Branching
Employ conditional branching to develop more relevant and customized workflows. This requires establishing if/then branches that direct contacts using different paths depending on the characteristics and behavior.
In HubSpot Workflows, the conditional branches can be developed depending on the following logic:
- Action Output- In this, you can automatically configure several branches depending on the single action from the previous workflow or the properties defined. However, this type of branching cannot be implemented using OR & AND criteria.
- If/Then Logic- In this, you need to manually configure the multiple branches depending upon the activities and properties. You can configure this branching type by using OR & AND criteria to filter enrolled records further. With this, up to 20 unique branches can be developed.
2. Integration with Other Tools
Enhance the HubSpot capabilities with additional features by using seamless integrations of the top tools. You can use the HubSpot App Marketplace to search applications and integrate them into your account.
When you connect an application that involves workflow functionalities, you will be able to use those actions in your HubSpot workflows. This allows you to leverage HubSpot workflows seamlessly with other CRM tools and applications like Salesforce and Slack on a single platform only.
3. Utilizing Workflow Goal
HubSpot workflow goals are an exciting feature that focuses on contact-based workflows. When your audience meets specific criteria, such as engaging with your content, submitting a form, or becoming a customer, they are automatically removed from the workflow. This helps reduce repetitive or unnecessary conversations.
Align your workflow goals with your unique business objectives to structure the nurturing process. By customizing automation to each contact's behavior, you can achieve a more strategic approach.
Conclusion
The key to successful HubSpot marketing automation workflows lies in setting clear goals, utilizing automation tools, and ensuring personalized engagement through segmentation. Also, regularly assessing and fine-tuning your HubSpot workflows keeps everything running smoothly.
However, if you are still unsure about getting this executed for your HubSpot workflows, you can connect with Hubspot consulting companies like Signity Solutions. Our Hubspot experts set up your workflows by leveraging its expert capabilities in HubSpot Marketing Automation Services.