How To Add a Google Map to HubSpot Content?
Learn how to enhance your HubSpot content by seamlessly integrating interactive Google Maps. This step-by-step guide helps you engage users, provide location-based information, and elevate their overall experience on your website.

Introduction
In the ever-evolving landscape of digital content, engagement is key. Incorporating interactive elements can significantly enhance user experience, and one such element is Google Maps. By seamlessly integrating a map into your HubSpot content, you can provide location-based information to your audience in an engaging and visually appealing manner. This article serves as a comprehensive guide to help you effortlessly add a Google Map to your HubSpot content.
Understanding the Benefits of Adding a Google Map
Imagine you're searching for a store's location or an event venue on a website. A static address might leave you puzzled, but a Google Map not only shows you where it is but also lets you explore the surrounding area. Adding a Google Map to your HubSpot content offers several benefits:
-
Enhanced Visual Context: Maps provide a visual context that simple text can't convey.
-
Interactive Engagement: Users can zoom in, zoom out, and explore the map, keeping them engaged.
-
Easy Navigation: A map enables users to get directions to your location with a simple click.
Preparing Your Google Map
Before embedding a Google Map into your HubSpot content, you need to create and customize the map itself:
-
Choose a Location: Visit the Google Maps platform and search for the location you want to display.
-
Set Markers: Add markers to pinpoint specific places of interest, such as your business address.
-
Customize Appearance: Modify the map's appearance to match your website's design.
Accessing the Embed Code
To integrate your customized Google Map into HubSpot, you'll need an embed code:
- Click on the "Share" or "Embed" option within the Google Map.
- Copy the provided embed code to your clipboard.
Adding the Google Map to HubSpot Content
Follow these simple steps to seamlessly incorporate your Google Map into HubSpot content:
Step 1: Log in to Your HubSpot Account
- Log in to your HubSpot account to access your dashboard.
Step 2: Create or Edit a Content Page
- Choose to either create a new content page or edit an existing one.
Step 3: Inserting the Embed Code
- In the content editor, locate the spot where you want to insert the map.
- Switch to HTML view (if available) to paste the embed code directly.
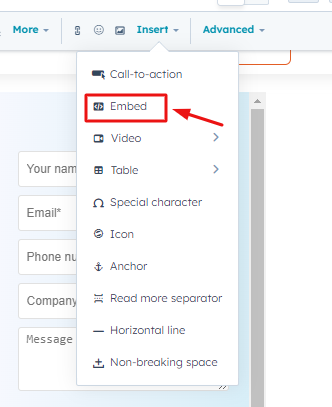
- If an HTML view is not available, use the Embed Code module (if supported) and paste the code there.

Step 4: Preview and Publish
- Before publishing, preview the content to ensure the map displays correctly.
- If satisfied, publish the content page to make it live with the embedded Google Map.
Tips for Effective Map Integration
To make the most of your Google Map integration, consider these tips:
- Keep the map relevant to the content's purpose.
- Adjust the map's dimensions to fit your content layout appropriately.
- Test the map's responsiveness on various devices to ensure a seamless experience.
Troubleshooting Common Issues
Encountering problems? Here are solutions to some common issues:
- If the map isn't displaying, double-check the embed code and the integration process.
- For incorrect location markers, review the coordinates and ensure they're accurate.
- If responsiveness is an issue, adjust the map's dimensions and settings accordingly.
Conclusion
Incorporating a Google Map into your HubSpot content can greatly enhance user engagement and provide valuable information at a glance. By following the steps outlined in this guide, you'll be able to seamlessly integrate maps that cater to your audience's location-based needs.
Keep experimenting with this interactive element to create compelling and informative content that resonates with your visitors.


%201-1.webp)


.png?width=344&height=101&name=Mask%20group%20(5).png)


